1. Tap “Add Beneficiary”
![ENG-HowToAddBene-CA_Step1](https://www.smileswallet.com/canada/wp-content/uploads/sites/5/2024/01/ENG-HowToAddBene-CA_Step1-1-243x528.png)
2. Select the destination your beneficiary will receive money
![](https://www.smileswallet.com/canada/wp-content/uploads/sites/5/2024/01/ENG-HowToAddBeneCA_Step2-243x528.png)
3. Select Smiles as a remittance method
![](https://www.smileswallet.com/canada/wp-content/uploads/sites/5/2024/01/ENG-HowToAddBeneSG_Step3-243x528.png)
4. Select how your beneficiary would like to receive money and input/select the details
![](https://www.smileswallet.com/canada/wp-content/uploads/sites/5/2024/01/ENG-HowToAddBene_Step4-243x528.png)
5. Input rest of beneficiary’s info and tap “Final review”
![](https://www.smileswallet.com/canada/wp-content/uploads/sites/5/2024/01/ENG-HowToAddBene_Step5-243x528.png)
6. Confirm info and tap “Next”
![](https://www.smileswallet.com/canada/wp-content/uploads/sites/5/2024/01/ENG-HowToAddBene_Step6-243x528.png)
7. If you agree with “FRAUD” reminders, please tap “Next” and complete process
![](https://www.smileswallet.com/canada/wp-content/uploads/sites/5/2024/01/ENG-HowToAddBene_Step7-243x528.png)
8. You have successfully added a beneficiary! Optionally add them as a “Favorite” to your home screen by checking the box.
![](https://www.smileswallet.com/canada/wp-content/uploads/sites/5/2024/01/ENG-HowToAddBene-CA_Step8a-243x528.png)
![Select bene](https://www.smileswallet.com/canada/wp-content/uploads/sites/5/2024/01/Select-bene-243x528.png)
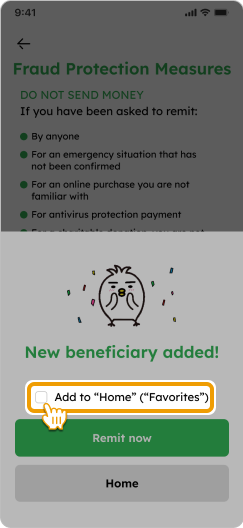
Add beneficiary to the home screen
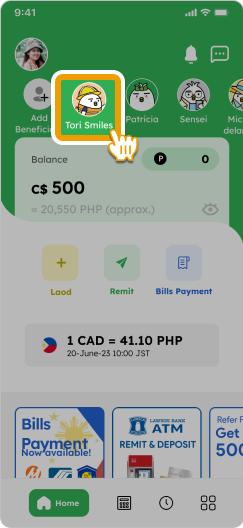
Add your favorite beneficiaries to the home screen for faster transactions!
1. Go to your beneficiary list
![](https://www.smileswallet.com/canada/wp-content/uploads/sites/5/2024/01/ENG-HowToAddBene_Step2-1-243x528.png)
2. Select the beneficiary
![](https://www.smileswallet.com/canada/wp-content/uploads/sites/5/2024/01/ENG-HowToAddBene_Step2-2-1.png)
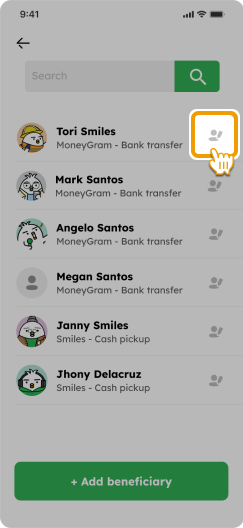
3. Tap on the star to add the beneficiary as a “Favorite” to your home screen
![](https://www.smileswallet.com/canada/wp-content/uploads/sites/5/2024/01/ENG-HowToAddBene_Step2-3-243x528.png)
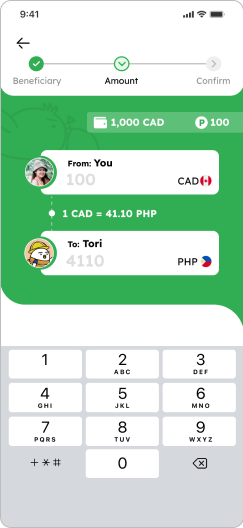
4. You can now remit faster by tapping on your beneficiary icon
![Select bene](https://www.smileswallet.com/canada/wp-content/uploads/sites/5/2024/01/Select-bene-243x528.png)
![ENG-HowToRemit-CA_Tips2](https://www.smileswallet.com/canada/wp-content/uploads/sites/5/2024/01/ENG-HowToRemit-CA_Tips2-243x528.png)
![tori-reading](https://www.smileswallet.com/canada/wp-content/themes/smilesremit/src/images/blocks/tori-reading.png)
Smiles Tips!
Tap and hold the beneficiary icon to either remove it or remit funds.
![ENG-HowToRemit-CA_Tips4](https://www.smileswallet.com/canada/wp-content/uploads/sites/5/2024/01/ENG-HowToRemit-CA_Tips4-1-243x528.png)
![ENG-HowToRemit-CA_Tips2](https://www.smileswallet.com/canada/wp-content/uploads/sites/5/2024/01/ENG-HowToRemit-CA_Tips2-243x528.png)